

I don't know about you guys but I've seen quite a few pictures of desserts like these on Pinterest lately. It got me wondering on how the people that made them, well, made them. So I examined a picture or two of the little rose cupcake pretties and did a little research as well and came up with a conclusion. It's a fairly easy conclusion, but can be time consuming, so you better be very ambitious to do these!

These deconstructed cakes are so cute and pretty simple to make. There's also a ton of pluses to doing these as well as it 1) uses up leftover cake scraps and 2) uses up leftover frosting. To me that's a major 2 in 1 because I always end up having extras of both items just chilling out in the freezer just waiting for their chance to shine in some gorgeous creation.

In a way these are basically the giant version of a cake pop, minus the stick. They are also super pretty and colorful, and you won't feel guilty if you eat a whole one because it's basically a cupcake. Making them are also incredibly simple and easy and anyone can do it!
Tools
- Cake - I used leftover cake scraps that I had lying in the freezer.
- Frosting - I also used leftover frosting that I had in the freezer.
- Fondant or Candy Clay in your choice of colors
- Large round cutters - I used this set from Ateco.
- Rolling pin
- Ball tool
- Thin foam pad
- Water and brush
- Exacto or paring knife
- Powdered sugar for dusting
Steps
- Break up the cake and add in frosting until it starts to stick together. Either take an ice cream scoop and do 2 scoops per "cupcake" or just take a big handful and form them into a cone like shape.

- Place the cake pieces on a parchment lined cookie sheet or plate and place in the fridge for at least 30-60 minutes to harden. (This makes it easier to attach the fondant)

- Take the cake out of the fridge and do a very thin layer of frosting to help the fondant stick.
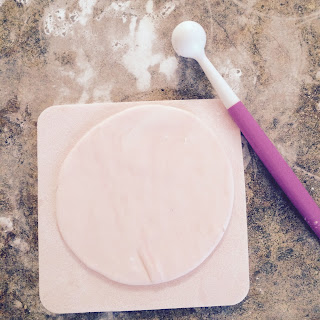
- Roll the fondant out nice and thin and cover the each cake.


- Roll out more fondant thinly and I used the 4th biggest round cutter to cut out 9 petals per cake.

- Take one of the fondant rounds and use the ball tool and thin foam pad to smooth out the sides of one half. Turn it upside and brush a small amount of water on the back to act as glue. Stick the fondant on the cone "cake" to form a bud/cone like form.

- For the first layer of petals take three of the fondant rounds, smooth out half of each round with the ball tool. Taking one at a time glue each petal on the cake.

- Repeat step 7 with the last 5 rounds to create the outer layer of the flower.

- Use toothpicks if so desired to help stick each petal up a bit and let dry. Once dry remove the toothpicks.


NOTE: These can be time consuming so if you're feeling really ambitious for a Valentine's day dessert or maybe for a little girl's birthday party, then this is something you should consider making!
No comments:
Post a Comment